Saturday, 11 March 2017

OBIEE – Filters

Filters are used to limit the results that are displayed when an analysis is run, so that the results answer a particular question. Based on the filters, only those results are shown that matches the criteria passed in the filter condition.
Filters are applied directly to attribute and measure columns. Filters are applied before the query is aggregated and affect the query and thus the resulting values for measures.
For example, you have a list of members in which the aggregate sums to 100. Over time, more members meet the set filter criteria, which increases the aggregate sum to 200.

Column Filters

Following are the ways to create filters −

Create a Named Column Filter

Go to Oracle Business Intelligence homepage → New menu → Select filter. The Select Subject Area dialog is displayed.
From the Select Subject Area dialog, choose the subject area for which you want to create a filter. The "Filter editor" is displayed from the "Subject Areas pane". Double-click the column for which you want to create the filter. New Filter dialog is displayed.

Create an Inline Filter

Either create an analysis or access an existing analysis for which you want to create a filter.
Click the Criteria tab → Locate the "Filters pane" → Click create a filter for the current subject area button. The analysis selected columns are displayed in the cascading menu.
Select a column name from the menu or select the More Columns option to access the “Select Column dialog" from which you can select any column from the subject area.
Once you select a column, the "New Filter dialog" is displayed.

OBIEE – Dashboards

OBIEE dashboard is a tool that enables end users to run ad-hoc reports and analysis as per business requirement model. Interactive dashboards are pixel perfect reports which can be directly viewed or printed by end users.
OBIEE dashboard is part of Oracle BI Presentation layer services. If your end user is not interested in seeing all the data in the dashboard, it allows you to add prompts to the dashboard that allows the end user to enter what he wants to see. Dashboards also allow end users to select from drop-down lists, multi-select boxes and selection of columns to display in the reports.

Dashboard Alerts

Oracle BI dashboard allows you to set up alerts for sales executives that comes up on the interactive dashboard whenever the company’s projected sales is going to be below forecast.

Create a New Dashboard

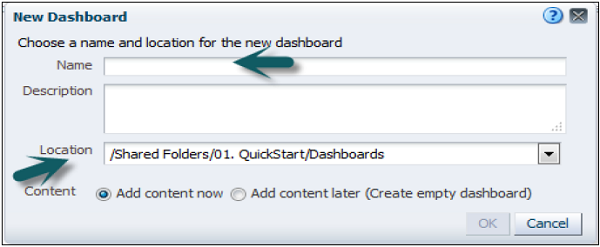
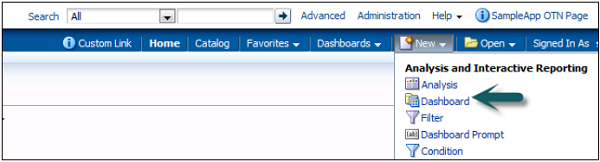
To create a new Dashboard, go to New → Dashboard or you can also click on Dashboard option under create on the left side.
Create New Dashboard
Once you click on Dashboard, new dashboard dialog box opens up. Enter the name of Dashboard and description and select the location where you want Dashboard to save → click OK.
New Dashboard
If you save the dashboard in the Dashboards subfolder directly under the /Shared Folders/first level subfolder → dashboard will be listed in the Dashboard menu on the global header.
If you save it in a Dashboards subfolder at any other level (such as /Shared Folders/Sales/Eastern), it will not be listed.
If you choose a folder in the Dashboards subfolder directly under the /Shared Folders/first level subfolder in which no dashboards have been saved, a new Dashboards folder is automatically created for you.
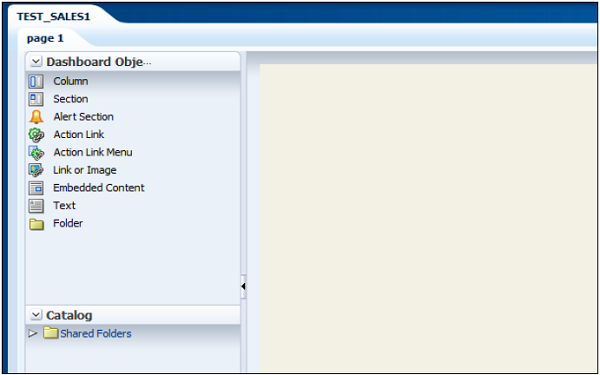
Once you enter the above fields, Dashboard builder will open up as shown in the following snapshot −
Dashboard Builder
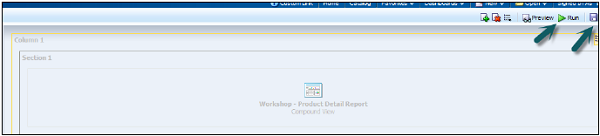
Expand the catalog tab, select analysis to add to Dashboard and drag to page layout pane. Save and run the dashboard.
Catalog Tab

Edit a Dashboard

Go to Dashboard → My Dashboard → Edit Dashboard.
Edit Dashboard
To edit Dashboard. Click on below icon → Dashboard properties.
Dashboard Properties Window
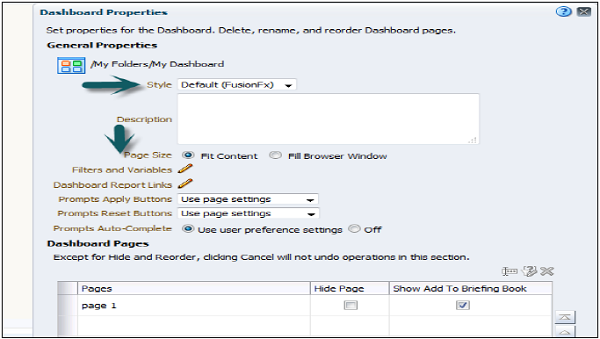
A new dialog box will appear as shown in the following snapshot. You can perform the following tasks −
Change the styles (Styles control how dashboards and results are formatted for display, such as the color of text and links, the font and size of text, the borders in tables, the colors and attributes of graphs, and so on). You can add a description.
You can add hidden prompts, filters, and variables. Specify the links that will display with analyses on a dashboard page. You can rename, hide, reorder, set permissions for, and delete dashboard pages.
Dashboard Properties
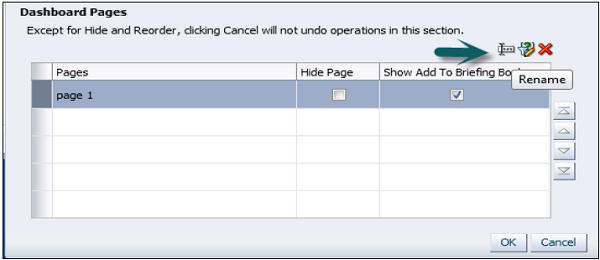
You can also edit Dashboard page properties by selecting page in the dialog box. You can make the following changes −
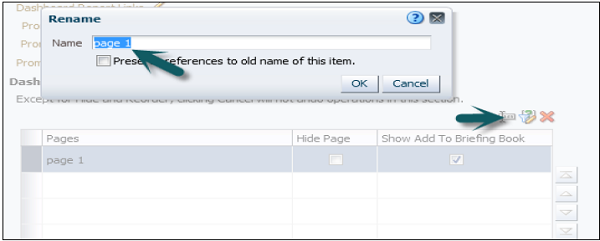
  • You can change the name of your dashboard page.
  • You can add a hidden prompt. Hidden prompts are used to set default values for all corresponding prompts on a dashboard page.
  • You can add permissions for the dashboard and can also delete the selected page. Dashboard pages are permanently deleted.
  • If more than one dashboard page is in this dashboard, the arrange order icons are enabled using up and down arrows.
Dashboard PagesDashboard Rename Page
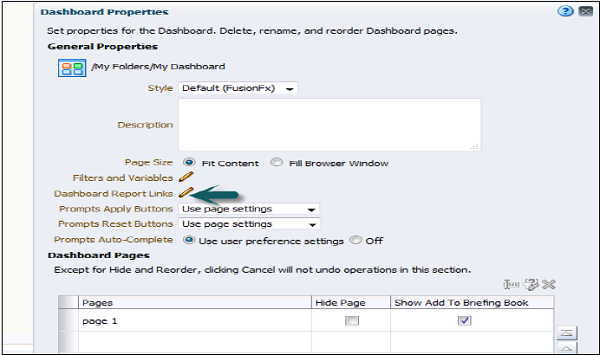
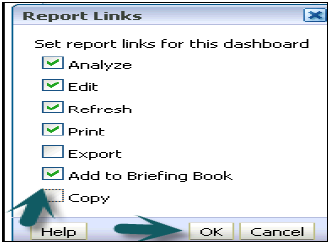
To set the report links at the dashboard level, dashboard page, or analysis level click the edit option of Dashboard reporting links.
Dashboard General PropertiesReport Links
To add a dashboard page, click on new Dashboard page icon → Enter the name of dashboard page and click OK.
Add New Dashboard Page
In Catalog tab, you can add the new another analysis and drag it to page layout area of new dashboard page.
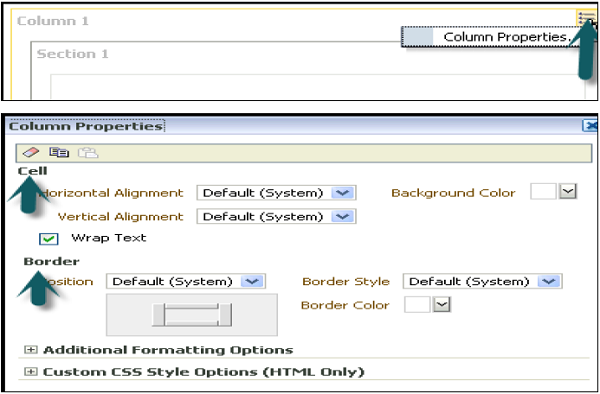
To edit the properties of dashboard like cell width, border, and height, click on column properties. You can set background color, wrap text and additional formatting options.
Column Properties
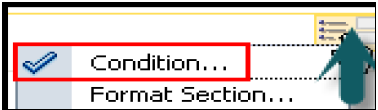
You can also add a condition on dashboard data display by clicking on condition option in column properties −
Add Condition
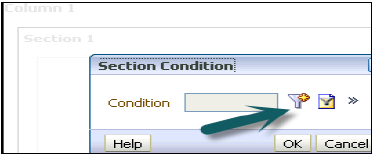
To add a condition, click on + sign in condition dialog box. You can add a condition based on analysis.
Select the condition data and enter the condition parameter.
Section Condition
You can also test, edit or remove the condition by clicking on ‘more’ sign next to + button.

Save a Customized Dashboard

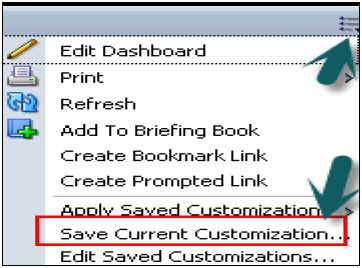
You can save your customized dashboard by going to page options → Save current customizations → Enter the name of customization → Click OK.
Save Customized Dashboard
To apply customization to a dashboard page, go to page option → Apply saved customization → Select name → Click OK.
It allows you to save and view dashboard pages in their current state such as filters, prompts, column sorts, drills in analyses, and section expansion and collapse. By saving customizations, you do not need to make these choices manually each time you access the dashboard page.

OBIEE – Variables

In OBIEE, there are two types of variables that are commonly used −
  • Repository variables
  • Session variables
Apart from this you can also define Presentation and Request variables.

Repository Variables

A Repository variable has a single value at any point of time. Repository variables are defined using Oracle BI Administration tool. Repository variables can be used in place of constants in Expression Builder Wizard.
There are two types of Repository variables −
  • Static repository variables
  • Dynamic repository variables
Static repository variables are defined in variable dialog box and their value exists until they are changed by the administrator.
Static repository variables contain default initializers that are numeric or character values. In addition, you can use Expression Builder to insert a constant as the default initializer, such as date, time, etc. You cannot use any other value or expression as the default initializer for a static repository variable.
In older BI versions, the Administrator tool did not limit value of static repository variables. You may get warning in consistency check if your repository has been upgraded from older versions. In such case, update the static repository variables so that default initializers have a constant value.
Dynamic repository variables are same as static variables but the values are refreshed by data returned from queries. When defining a dynamic repository variable, you create an initialization block or use a preexisting one that contains a SQL query. You can also set up a schedule that the Oracle BI Server will follow to execute the query and refresh the value of the variable periodically.
When the value of a dynamic repository variable changes, all cache entries associated with a business model are deleted automatically.
Each query can refresh several variables: one variable for each column in the query. You schedule these queries to be executed by the Oracle BI server.
Dynamic repository variables are useful for defining the content of logical table sources. For example, suppose you have two sources for information about orders. One source contains current orders and the other contains historical data.

Create Repository Variables

In the Administration Tool → Go to Manage → Select Variables → Variable Manager → Go to Action → New → Repository > Variable.
In the Variable dialog, type a name for the variable (Names for all variables should be unique) → Select the type of variable - Static or Dynamic.
If you select dynamic variable, use the initialization block list to select an existing initialization block that will be used to refresh the value on a continuing basis.
To create a new initialization block → Click New. To add a default initializer value, type the value in the default initializer box, or click the Expression Builder button to use Expression Builder.
For static repository variables, the value you specify in the default initializer window persists. It will not change unless you change it. If you initialize a variable using a character string, enclose the string in single quotes. Static repository variables must have default initializers that are constant values → Click OK to close the dialog box.

Session Variables

Session variables are similar to dynamic repository variables and they obtain their values from initialization blocks. When a user begins a session, the Oracle BI server creates new instances of session variables and initializes them.
There are as many instances of a session variable as there are active sessions on the Oracle BI server. Each instance of a session variable could be initialized to a different value.
There are two types of Session variables −
  • System session variables
  • Non-system session variables
System session variables are used by Oracle BI and Presentation server for specific purposes. They have predefined reserved names which can’t be used by other variables.
USER
This variable holds the value the user enters with login name. This variable is typically populated from the LDAP profile of the user.
USERGUID
This variable contains the Global Unique Identifier (GUID) of the user and it is populated from the LDAP profile of the user.
GROUP
It contains the groups to which the user belongs. When a user belongs to multiple groups, include the group names in the same column, separated by semicolons (Example - GroupA;GroupB;GroupC). If a semicolon must be included as part of a group name, precede the semicolon with a backslash character (\).
ROLES
This variable contains the application roles to which the user belongs. When a user belongs to multiple roles, include the role names in the same column, separated by semicolons (Example - RoleA;RoleB;RoleC). If a semicolon must be included as part of a role name, precede the semicolon with a backslash character (\).
ROLEGUIDS
It contains the GUIDs for the application roles to which the user belongs. GUIDs for application roles are the same as the application role names.
PERMISSIONS
It contains the permissions held by the user. Example - oracle.bi.server.manageRepositories.
Non-system session variables are used for setting the user filters. Example, you could define a non-system variable called Sale_Region that would be initialized to the name of the sale_region of the user.

Create Session Variables

In the Administration Tool → Go to Manage → Select Variables.
In the Variable Manager dialog, click Action → New → Session → Variable.
In the Session Variable dialog, enter variable name (Names for all variables should be unique and names of system session variables are reserved and cannot be used for other types of variables).
For session variables, you can select the following options −
  • Enable any user to set the value − This option is used to set session variables after the initialization block has populated the value. Example - this option lets non-administrators set this variable for sampling.
  • Security sensitive − This is used to identify the variable as sensitive to security when using a row-level database security strategy, such as a Virtual Private Database (VPD).
You can use the initialization block list option to choose an initialization block that will be used to refresh the value regularly. You can also create a new initialization block.
To add a default initializer value, enter the value in the default initializer box or click the Expression Builder button to use Expression Builder. Click OK to close the dialog box.
The administrator can create non-system session variables using Oracle BI Administration tool.

Presentation Variables

Presentation variables are created with creation of Dashboard prompts. There are two types of dashboard prompts that can be used −

Column Prompt

Presentation variable created with column prompt is associated with a column, and the values that it can take comes from the column values.
To create a presentation variable go to New Prompt dialog or Edit Prompt dialog → Select Presentation Variable in the Set of a variable field → Enter the name for the variable.

Variable Prompt

Presentation variable created as variable prompt is not associated with any column and you need to define its values.
To create a presentation variable as part of a variable prompt, in the New Prompt dialog or Edit Prompt dialog → Select Presentation Variable in the Prompt for field → Enter the name for the variable.
The value of a presentation variable is populated by the column or variable prompt with which it is created. Each time a user selects a value in the column or variable prompt, the value of the presentation variable is set to the value that the user selects.

Initialization Blocks

Initialization blocks are used to initialize OBIEE variables: Dynamic Repository variables, system session variables and non-system session variables.
It contains SQL statement that are executed to initialize or refresh the variables associated with that block. The SQL statement that are executed points to physical tables that can be accessed using the connection pool. Connection pool is defined in the initialization block dialog.
If you want the query for an initialization block to have database-specific SQL, you can select a database type for that query.

Initialize Dynamic Repository Variables using Initialization Block

Default initiation string field of initialization block is used to set value of dynamic repository variables. You also define a schedule which is followed by Oracle BI server to execute the query and refresh the value of variable. If you set the logging level to 2 or higher, log information for all SQL queries executed to retrieve the value of variable is saved in nqquery.log file.
Location of this file on BI Server −
ORACLE_INSTANCE\diagnostics\logs\OracleBIServerComponent\coreapplication_obisn

Initialize Session Variables using Initialization Block

Session variables also take their values from initialization block but their value never changes with time intervals. When a user begins a new session, Oracle BI server creates a new instance of session variables.
All SQL queries executed to retrieve session variable information by BI server if the logging level is set to 2 or higher in the Identity Manager User object or the LOGLEVEL system session variable is set to 2 or higher in the Variable Manager is saved in nqquery.log file.
Location of this file on BI Server −
ORACLE_INSTANCE\diagnostics\logs\OracleBIServerComponent\coreapplication_obisn

Create Initialization Blocks in Administrator Tool

Go to Manager → Variables → Variable Manager Dialog box appears. Go to Action menu → Click New → Repository → Initialization Block → Enter the name of initialization block.
Go to Schedule tab → Select start date and time and refresh interval.
You can choose the following options for Initialization Blocks −
  • Disable − If you select this option, initialization block is disabled. To enable an initialization block, right-click an existing initialization block in the Variable Manager and choose Enable. This option enables you to change this property without opening the initialization block dialog.
  • Allow deferred execution − This allows you to defer the execution of the initialization block until an associated session variable is accessed for the first time during the session.
  • Required for authentication − If you select this, initialization block must execute for users to log in. Users are denied access to Oracle BI if the initialization block doesn’t execute.

OBIEE – Aggregates

Aggregations are used to implement query performance optimization while running the reports. This eliminates the time taken by query to run the calculations and delivers the results at fast speed. Aggregate tables has less number of rows as compared to a normal table.
How Aggregation Works in OBIEE?

When you execute a query in OBIEE, BI server looks for the resources which has information to answer the query. Out of all available sources, the server selects the most aggregated source to answer that query.
Adding Aggregation in a Repository

Open the Repository in an offline mode in the Administrator tool. Go to File → Open → Offline.
Import the metadata and create logical table source in BMM layer. Expand the table name and click on source table name to open logical table source dialog box.
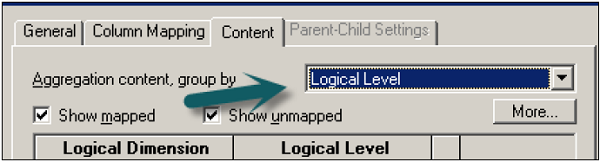
Go to column mapping tab to see map columns in Physical table. Go to content tab → Aggregate content group by selecting the logical level.
Adding Aggregation in Repository
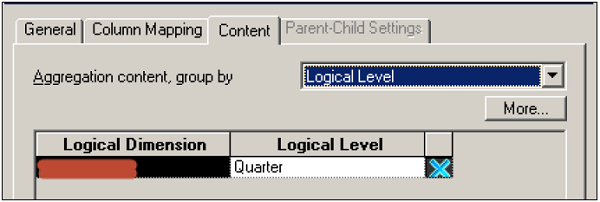
You can select different logical levels as per the columns in fact tables like Product Total, Total Revenue, and Quarter/Year for Time as per dimension hierarchies.
Select Different Logical Levels
Click OK to close dialog box → save the repository.
When you define Aggregate in logical fact tables they are defined as per dimension hierarchies.

OBIEE – Testing Repository

You can check the repository for errors by using the consistency checking option. Once it is done, next step is to load the repository into Oracle BI Server. Then test the repository by running an Oracle BI analysis and verifying the results.
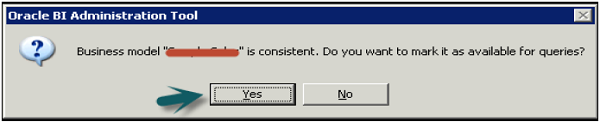
Go to File → click on Check Global Consistency → You will receive the following message → Click Yes.
Testing Repository
Once you click OK → Business model under BMM will change to Green → Click on save the repository without checking global consistency again.

Disable Caching

To improve query performance, it is advised to disable BI server cache option.
Open a browser and enter the following URL to open Fusion Middleware Control Enterprise Manager: http://<machine name>:7001/em
Enter the user name and password. Click Login.
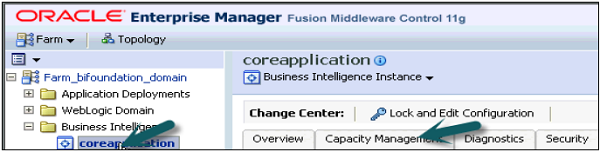
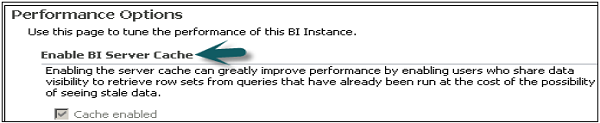
On the left side, expand Business Intelligence → coreapplication → Capacity Management tab → Performance.
Testing Repository Disable Caching
Enable BI Server Cache section is by default checked → Click on Lock and Edit Configuration → Close.
Testing Repository Enable BI Server
Now deselect cache enabled option. It is used to improve query performance. Go to Apply → Activate Changes → Completed Successfully.

Load the Repository

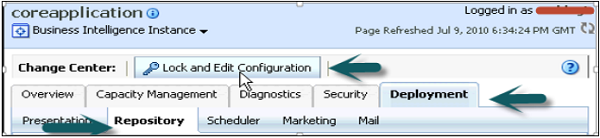
Go to Deployment tab → Repository → Lock and Edit Configuration → Completed Successfully.
Load Testing Repository
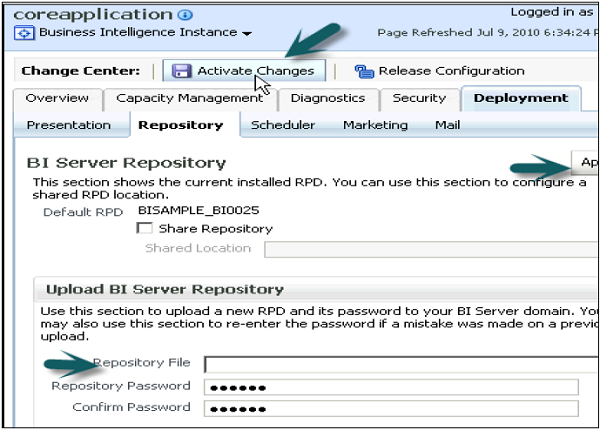
Click on Upload BI Server Repository section → Browse to open the Choose file dialog box → select the Repository .rpd file and click Open → Enter Repository password → Apply → Activate Changes.
Upload BI Server Repository
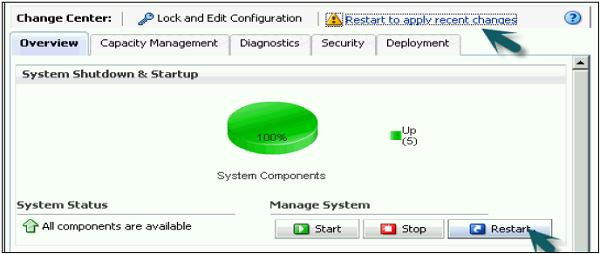
Activate Changes → Completed Successfully → Click on Restart to apply recent changes option at the top → Click Yes.
Testing Repository Completed Successfully
Repository is successfully created and loaded for query analysis.

Enable Query Logging

You can set up query logging level for individual users in OBIEE. Logging level controls the information that you will retrieve in log file.

Set Up Query Logging

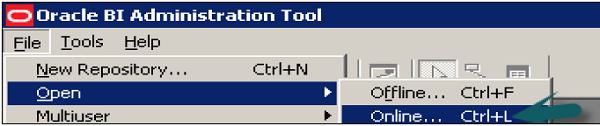
Open the Administration tool → Go to File → Open → Online.
Online mode is used to edit the repository in Oracle BI server. To open a repository in online mode, your Oracle BI server should be running.
Set Up Query Logging
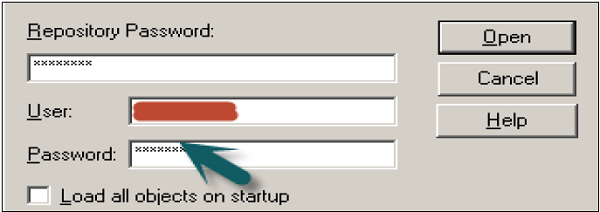
Enter the Repository password and user name password to login and click Open to open the repository.
Repository Password
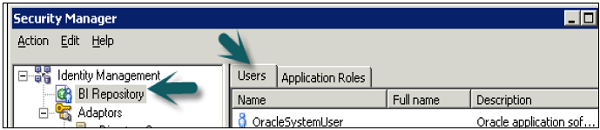
Go to Manage → Identity → Security Manager Window will open. Click BI Repository on the left side and double-click on Administrative user → User dialogue box will open.
Security Manager
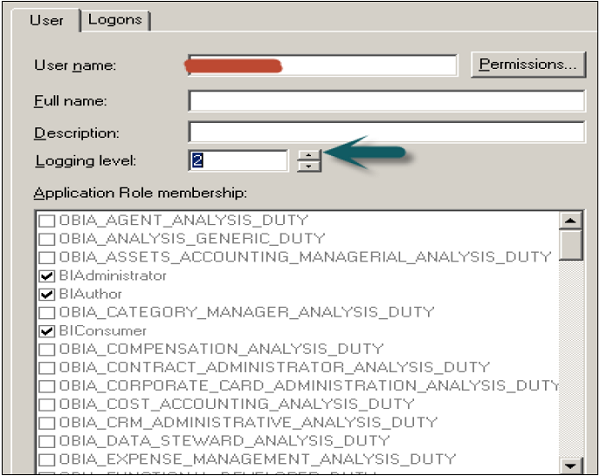
Click User tab in user dialogue box, you can set logging levels here.
In normal scenario − The user has a logging level set to 0 and the administrator has a logging level set to 2. Logging level can have values starting from Level 0 to level 5. Level 0 means no logging and Level 5 means maximum logging level information.

Logging Level Descriptions

Level 0No logging
Level 1
Logs the SQL statement issued from the client application
Logs elapsed times for query compilation, query execution, query cache processing, and back-end database processing
Logs the query status (success, failure, termination, or timeout). Logs the users ID, session ID, and request ID for each query
Level 2
Logs everything logged in Level 1
Additionally, for each query, logs the repository name, business model name, presentation catalog (called Subject Area in Answer) name, SQL for the queries issued against physical databases, queries issued against the cache, number of rows returned from each query against a physical database and from queries issued against the cache, and the number of rows returned to the client application
Level 3
Logs everything logged in Level 2
Additionally, adds a log entry for the logical query plan, when a query that was supposed to seed the cache was not inserted into the cache, when existing cache entries are purged to make room for the current query, and when the attempt to udate the exact match hit detector fails
Level 4
Logs everything logged in Level 3
Additionally, logs the query execution plan.
Level 5
Logs everything logged in Level 4
Additionally, logs intermediate row counts at various points in the execution plan.

To Set Logging Level

In user dialogue box, enter value for logging level.
Set Logging Level
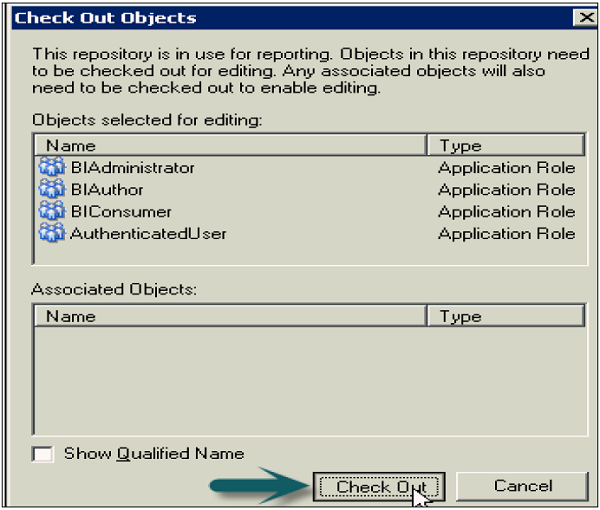
Once you click OK, it will open the checkout dialogue box. Click Checkout. Close the Security Manager.
Check Out Objects
Go to file → Click on check-in changes → Save the repository using the Save option at the top → To take changes in effect → Click OK.
Check in Changes

Use Query Log to Verify Queries

You can check query logs once query logging level is set by going to Oracle Enterprise Manager and this helps to verify queries.
To check the query logs to verify queries, go to Oracle Enterprise Manager OEM.
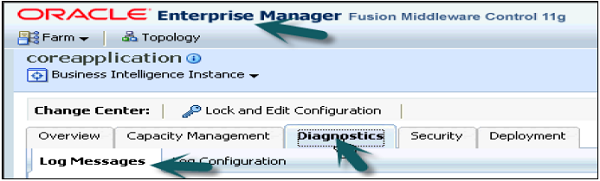
Go to diagnostic tab → click Log messages.
Verify Queries Using Query Log
Scroll down to bottom in log messages to see Server, Scheduler, Action Services and other log details. Click on Server log to open log messages box.
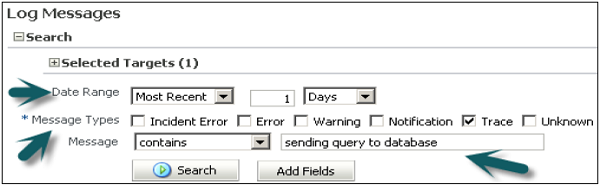
You can select various filters − Date Range, Message types and message contains/not contains fields, etc. as shown in the following snapshot −
Log Messages
Once you click on search, it will show log messages as per filters.
Filter Log Messages
Clicking on collapse button allows you to check details of all log messages for queries.

OBIEE – Presentation Layer

Presentation layer is used to provide customized views of Business model in BMM layer to users. Subject areas are used in Presentation layer provided by Oracle BI Presentation Services.
There are various ways you can create subject areas in Presentation layer. Most common and simple method is by dragging Business Model in BMM layer to Presentation Layer and then making changes to it as per requirement.
You can move columns, remove or add columns in presentation layer so it allows you to make changes in a way that the user shouldn’t see columns that has no meaning for them.
Create Subject Areas/Presentation Catalogues and Presentation Tables in Presentation Layer
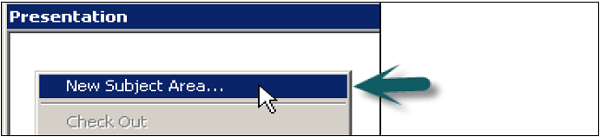
Right-click on Presentation area → New Subject Area → In General tab enter the name of subject area (Recommended similar to Business Model) → Click OK.
Presentation Layer
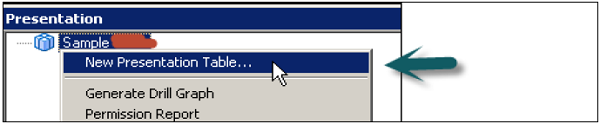
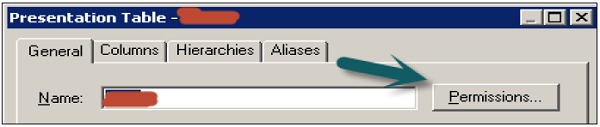
Once Subject area is created, right click on subject area → New Presentation table → in General tab, Enter name of presentation table → OK (Add number of presentation tables equal to number of parameters required in the report).
New Presentation Layer Table
Click the Permissions tab → Permissions dialog box, where you can assign user or group permissions to the table.
Permissions Dialog Box

Delete a Presentation Table

In the Presentation layer, right-click on subject Area → Presentation Catalog dialog box, click the Presentation Tables tab → Go to Presentation Tables tab, select a table and click Remove.
A confirmation message appears → Click Yes to remove the table or No to leave the table in the catalog → Click OK.

Move a Presentation Table

Go to Presentation Tables tab by a right-click on Subject Area → In the Name list, select the table you want to reorder → Use drag-and-drop to reposition the table or you can also use the Up and Down buttons to reorder the tables.

Presentation Columns Under Presentation Table

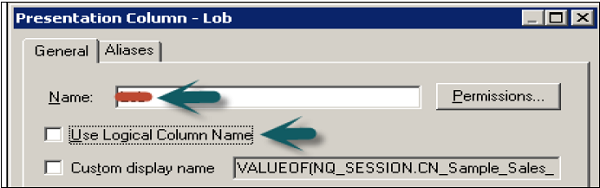
The name of presentation columns are normally same to the logical column names in the Business Model and Mapping layer. However, you can also enter a different name by unchecking Use Logical Column Name and the Display Custom Name in the Presentation Column dialog box.

Create Presentation Columns

The most simple way to create columns under Presentation tables is by dragging the columns from logical tables in BMM layer.
Select the objects under logical tables in BMM and drag them to Presentation tables under subject area (Use Ctrl key to select multiple objects for dragging). Repeat the process and add the logical columns to the remaining presentation tables.
Create a New Presentation Column −
Right-click on Presentation table in the Presentation layer → New Presentation Column.
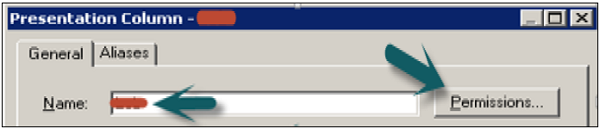
Presentation Column dialog box appears. To use the name of the logical column, select the Use Logical Column checkbox.
New Presentation Column
To specify a name that is different name, uncheck the Use Logical Column check box, and then type a name for the column.
To assign user or group permissions to the column, click Permissions → In the Permissions dialog box, assign permissions → click OK.
Presentation Layer Permissions Dialog Box

Delete a Presentation Column

Right-click on presentation table in the Presentation layer → Click on Properties → Click on the Columns tab → Select the column you want to delete → Click Remove or press the Delete key →Click Yes.

To Reorder a Presentation Column

Right-click on presentation table in the Presentation layer → Go to Properties → Click the Columns tab → Select the column you want to reorder → Use drag-and-drop or you can also click Up and Down button → Click OK.