Where to get the software:
You can download the software discussed here from OTN’s Software Downloads page at: http://www.oracle.com/technology/software/index.html. It’s important to remember that each software component available from this page comes with a Development License, which allows for free download and unlimited evaluation time. This license is available at:
- http://www.oracle.com/technology/
- software/popup-license/standard-license.html.
Turning back to OTN’s Software Downloads page, go to the Middleware section and, assuming you want to download Oracle Business Intelligence suite, click the Business Intelligence SE link to proceed to the Oracle Application Server 10g Release 2 (10.1.2.0.2) page at:
- http://www.oracle.com/technology/software/products/ias/htdocs/101202.html.
The number of CDs, and the size of packages to be copied on them, may vary depending on the operating system. What you need to do is download the packages and then copy each to a CD.
If, in place of the Oracle Business Intelligence suite, you want to download the Portal, Forms, Reports, and Discoverer suite, you have to follow the Oracle Fusion Middleware 11g R1 link that can be found in the Middleware section on OTN’s Software Downloads page.
As a result, you’ll move on to the Oracle Fusion Middleware 11gR1 Software. Downloads page at:
- http://www.oracle.com/technology/software/products/middleware/htdocs/fmw_11_download.html.
On this page, move on to the Portal, Forms, Reports and Discoverer section and pick up the distribution divided into several packages. Again, the number of packages within a distribution, and their size, may vary depending on the operating system.
Installation process
This section provides a quick guide to installing the Oracle Business Intelligence suite, part of Oracle Application Server 10g Release 2.
Here are the steps you need to perform in order to install the Oracle Business Intelligence suite on Windows (on other operating system platforms, the installation process is similar to this one):
- Insert the CD labeled CD1 (assuming you marked the disks as they were marked on the download page) into your disk drive.
- In the root directory of the CD, find and execute the setup.exe file. It starts the Oracle Universal Installer, checking first if the Installer requirements are met.
- The first screen of the Oracle Universal Installer you should see is the Welcome screen, which should look like the following screenshot.

- If you don’t want to de-install Oracle products that might already be installed on your machine, click the Next button on the Welcome screen to move on to the next screen of the Installer, which is called Specify File Locations.
- On the Specify File Locations screen, you can change the source to install the software from and/or the destination where you want to install it. You are unlikely to want to change the path to the source, because it’s detected automatically. However, you will most likely want to change the destination folder.
- Once you have set the paths on the Specify File Locations screen as needed, click Next to make the Installer analyze dependencies and continue with the installation.
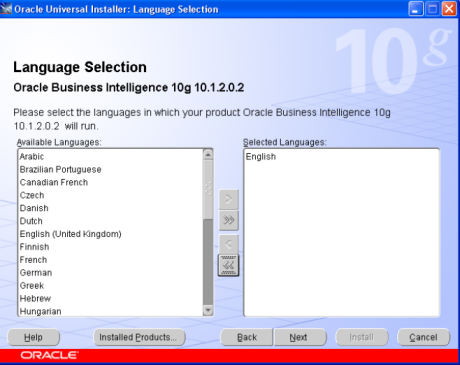
- After analyzing dependencies, the Installer should open the Language Selection screen, where you can select the languages in which the product will run:
- On the next screen called Specify Instance Name and ias_admin Password, you must specify the name for the Oracle Business Intelligence instance being installed, as well as the password for it:
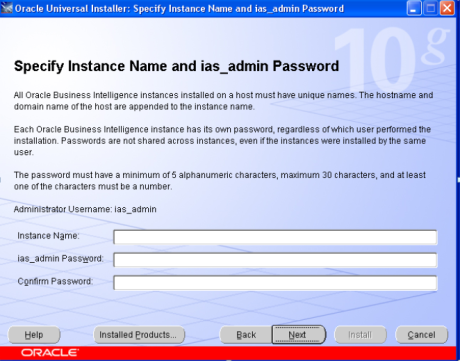
- Once you have completed these fields, click Next to proceed.
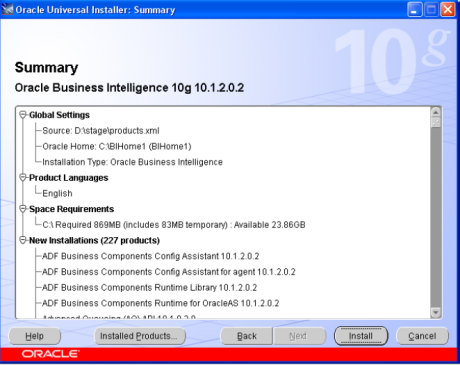
- The next screen is Summary, which summarizes the information about the current installation. In particular, it shows the languages you’ve chosen for the products being installed, global settings, space requirements, and finally the list of the products to be installed:
- As you should see in the Install screen, the installation process consists of the following three phases:
- Copying files
- Setting up
- *Configuration
- At some point, during the copying files stage, you’ll be prompted to insert Oracle BI CD2 into your disk drive.
- After the copying files stage has been completed successfully, the Installer will proceed to the setting up stage and ask you to insert Oracle BI CD1 again.
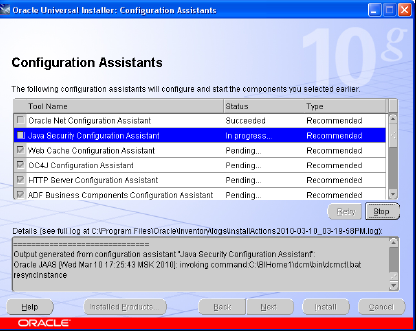
- Once the setup process is completed, the Installer proceeds to the configuration stage. The Configuration Assistants screen appears, where you can see the configuring work in progress. It’s highly recommended that all the assistants have completed successfully before you go any further:
- After all the assistants have completed successfully, you can click the Next button in the Configuration Assistants screen. As a result, the End of Installation screen shown should appear:

- On the End of Installation screen, look through the information provided in the Please remember … box, and click Exit to complete the installation and exit the Installer.
- After you exit the Installer, the page entitled Welcome to Oracle Business Intelligence should be opened in your browser.
By now, you should have the Oracle Business Intelligence suite installed on your computer. This is not it, though. You may still need to install some additional software and perform post-installation tasks.
Installing the Oracle Business Intelligence Tools package
If you are a Windows user, it’s highly recommended that you also install the Oracle Business Intelligence Tools package. As mentioned earlier in the chapter, the Tools installation package can be found in the Business Intelligence section at the Oracle. Application Server download page—just another package to download in this section, labeled as “Tools CD”. On this download page, in the Business Intelligence sections other than for Windows, this package is not available.
The following are the steps for installing the Oracle Business Intelligence Tools suite on your machine:
- Insert the CD labeled Tools CD into your disk drive.
- The root directory of the Tools CD contains the autorun.inf file, which means the setup.exe should be launched automatically. If AutoRun is disabled in your system, launch setup.exe manually.
- As with an Oracle Business Intelligence suite installation, this installation is managed by the Oracle Universal Installer. If the Installer requirements are met, the first screen you should see is the Welcome screen—the same one you saw earlier in this chapter. To move on to the next screen, just click the Next button.
- The next screen is the Specify File Locations screen, where you can change the paths to the source and destination of the installation. Then, click Next to continue.
- On the next screen called Select Installation Type, you have to select the type of installation you want. The options are the following:
- Business User
- Administrator/Power User
- Developer
- Custom
- On the Select Installation Type screen, also make sure to select the product languages in the Language Selection dialog, which you can launch by clicking on the Product Languages button.
- On the Available Product Components screen that appears in the case of choosing Custom on the preceding screen, select components you want to 0uinclude to your installation, and then click Next to proceed.
At this stage, you can easily exclude the components that you won’t need. For example, if you don’t use JDeveloper, you won’t need the Oracle Business Intelligence Beans (for JDeveloper) component.
- The next screen you should see is Provide Outgoing Mail Server Information, which you can leave blank if you’re not going to distribute reports via e-mail.
- At this point, you should reach the Summary screen, detailing all the information about the current installation. You have two options here: Install and Back. Choose the former to launch the installation of an Oracle Business Intelligence Tools instance on your machine, or the latter to go back and change the parameters of the installation.
- After Install is clicked on the Summary screen, the Installer opens the Install screen to keep you informed about the installation process details. As with the Oracle Business Intelligence suite installation, this installation consists ofthe following three phases:
- Configuration
- Setting up
- Copying files
- At the configuration stage, the Configuration Assistants screen should appear. The only configuration assistant to go through should be the Oracle Net Configuration Assistant, whose wizard should be automatically launched. The first screen of the Oracle Net Configuration Assistant is a Welcome screen.
- On the Welcome screen of the Net Configuration Assistant wizard, click Next. As a result, you should immediately move on to the Done screen, the last screen of the wizard.
- On the Done screen of the Net Configuration Assistant, click Finish, which should close the Net Configuration Assistant wizard.
- After the Net Configuration Assistant wizard is complete, the End of Installation screen of the Installer should appear. In this screen, click Exit to complete the installation.
- After you exit the Installer, the page entitled Welcome to Oracle Business Intelligence Tools should be automatically opened in your browser. This completes the installation of a Business Intelligence Tools instance on your computer. Before you can use it, however, some post-installation tasks need to be completed.
Post-installation tasks
Once you have downloaded and installed the Oracle Business Intelligence and Oracle Business Intelligence Tools packages, make sure that you have the database engine they need up and running.
To be able to connect to Discoverer Administrator, make sure you have a net service name for the underlying database defined in the tnsnames.ora file, which should be located in the BITools_Home/network/admin directory.
While this task can be performed manually by editing the tnsnames.ora file with a text editor, the following steps describe how you might solve it with the Net Configuration Assistant visual tool instead:
- Launch Net Configuration Assistant by clicking Start | Programs | Oracle- BIToolsHome1 | Configuration and Migration Tools | Net Configuration Assistant.
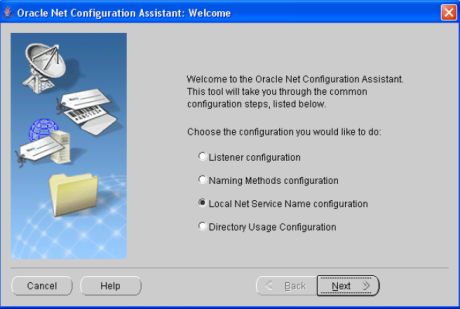
- On the Welcome screen of the assistant, choose Local Net Service Name configuration, and click Next.
- The next screen you should see is called Net Service Name Configuration, in which you should select Add, and click Next.
- On the Net Service Name Configuration, the Service Name screen appears next, where you’ll be prompted to enter the service name of your Oracle database. If you have, for example Oracle Database XE, this could be XE.
- On the next screen, called Net Service Name Configuration, Select Protocols, choose a protocol to communicate with the database across the network and click Next.
- On the next screen, called Net Service Name Configuration, Select Protocols, choose a protocol to communicate with the database across the network and click Next.
- On the Net Service Name Configuration, TCP/IP Protocol screen, specify the host name of the computer where the database is installed, as well as the port number, and click Next.
- On the Net Service Name Configuration, Test screen, you can select Yes, perform a test to test that a connection can be made, or No, do not test and click Next to skip to the next screen.
- . On the Net Service Name Configuration, Test screen, you can select Yes, perform a test to test that a connection can be made, or No, do not test and click Next to skip to the next screen.
- On the Net Service Name Configuration, Net Service Name screen, provide the Net Service Name, say, XE, and then click Next.
- On the Net Service Name Configuration, Another Net Service screen, select No and click Next.
- On the Net Service Name Configuration Done screen, click Next. This will bring back the Welcome screen of the wizard.
- On the Welcome screen, click Finish to complete the configuration steps.
As a result of the above steps, the tnsnames.ora file should appear in the BITools_Home/network/admin directory. If you open this file with a text editor, you should see the entry looking like this:
# tnsnames.ora Network Configuration File: C:\oracle\BIToolsHome_1\network\admin\tnsnames.ora
# Generated by Oracle configuration tools.
XE =

(DESCRIPTION =

(ADDRESS_LIST =

(ADDRESS = (PROTOCOL = TCP)(HOST = yul)(PORT = 1521))

)

(CONNECT_DATA =

(SERVICE_NAME = XE)

)

)
Now that you have defined a net service name for the underlying database in the BITool’s tnsnames.ora file, you can move on and create an EUL with Discoverer Administrator. Here are the steps:
- Launch Discoverer Administrator by clicking Start | Programs | Oracle Business Intelligence Tools-BIToolsHome1 | Oracle Discoverer Administrator.
- In the modal dialog Connect to Oracle Business Intelligence Discoverer Administrator, you’ll be prompted to enter a username/password pair to connect to the database, as well as the database service name you specified when creating net service name configuration, as described in the preceding steps.
- Once you have specified the information required to connect to the database and clicked Connect, Discoverer Administrator will ask you to create an EUL, because you do not have access to one. Click Yes to create one.
- As a result, the EUL Manager dialog should appear:
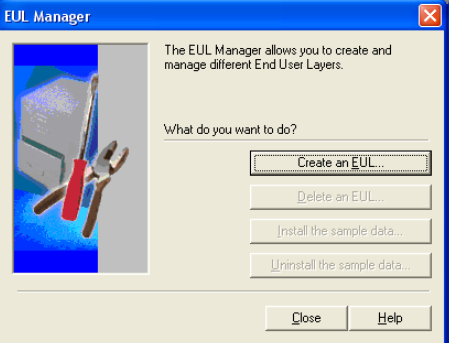
- In the EUL Manager dialog, click the Create an EUL … button to proceed to creating a new EUL. This will launch the Create EUL Wizard.
- On the first step of the Create EUL Wizard, you can select a user from the list of database users. This can be done in the Select User dialog, which you can open by clicking the Select … button on the wizard screen.
- In the Select User dialog, click Go to see a list of all the users available. Choose one by double-clicking it. For example, you might choose the HR user as it represents a demonstration schema installed with an Oracle database by default.
- After a user has been selected, the Finish button in the Create EUL Wizard should become available. Click it to make Discoverer Administrator create the EUL. This process will go on behind the scenes and should take less than a minute. Once it’s completed, you should see a message informing you about it.
- Close the EUL Manager dialog by clicking Close.
Finally, you can connect to Discoverer Plus. To launch Discoverer, point your browser to the following URL: http://yourhostname:7777/discoverer/plus. This should output the login page:

The User Name and Password fields in the above login form assume you provide a database username and its password, respectively.
OBIEE – Architecture
OBIEE Architecture involves various BI system components which are required to process the end user’s request.
How OBIEE System Actually Works?
The initial request from the end user is sent to the Presentation server. The Presentation server converts this request in logical SQL and forwards it to BI server component. BI server converts this into physical SQL and sends it to database to get the required result. This result is presented to the end user through the same way.
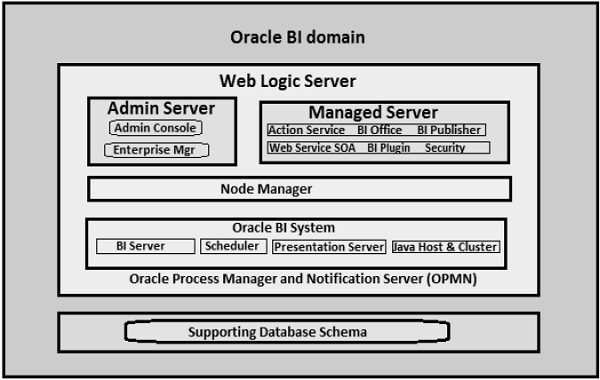
The following diagram shows detailed OBIEE Architecture −
OBIEE Architecture contains Java and non-Java components. Java components are Web Logic Server components and non-Java components are called Oracle BI system component.
Web Logic Server
This part of OBIEE system contains Admin Server and Managed Server. Admin server is responsible for managing the start and stop processes for Managed server. Managed Server comprises of BI Plugin, Security, Publisher, SOA, BI Office, etc.
Node Manager
Node Manager triggers the auto start, stop, restart activities and provides process management activities for Admin and Managed server.
Oracle Process Manager and Notification Server (OPMN)
OPMN is used to start and stop all components of BI system. It is managed and controlled by Fusion Middleware Controller.
Oracle BI System Components
These are non-Java components in an OBIEE system.
Oracle BI Server
This is the heart of Oracle BI system and is responsible for providing data and query access capabilities.
BI Presentation Server
It is responsible to present data from BI server to web clients which is requested by the end users.
Scheduler
This component provides scheduling capability in BI system and it has its own scheduler to schedule jobs in OBIEE system.
Oracle BI Java Host
This is responsible for enabling BI Presentation server to support various Java tasks for BI Scheduler, Publisher and graphs.
BI Cluster Controller
This is used for load balancing purposes to ensure that the load is evenly assigned to all BI server processes.
It is nice blog Thank you provide important information and i am searching for same information to save my time Informatica Online Training
ReplyDelete