Business Layer defines the business or logical model of objects and their mapping between business model and Schema in the physical layer. It simplifies the Physical Schema and maps the user business requirement to physical tables.
The business model and mapping layer of OBIEE system administration tool can contain one or more business model objects. A business model object defines the business model definitions and the mappings from logical to physical tables for the business model.
The business model is used to simplify the schema structure and maps the users’ business requirement to physical data source. It involves creation of logical tables and columns in the business model. Each logical table can have one or more physical objects as sources.
There are two categories of logical tables − fact and dimension. Logical fact tables contain the measures on which analysis is done and Logical dimension tables contain the information about measures and objects in Schema.
While creating a new repository using OBIEE administration tool, once you define the physical layer, create joins and identify foreign keys. The next step is to create a business model and mapping BMM layer of the repository.
Steps involved in defining Business Layer −
- Create a business model
- Examine logical joins
- Examine logical columns
- Examine logical table sources
- Rename logical table objects manually
- Rename logical table objects using the rename wizard and delete unnecessary logical object
- Creating measures (Aggregations)
Create Business Layer in the Repository
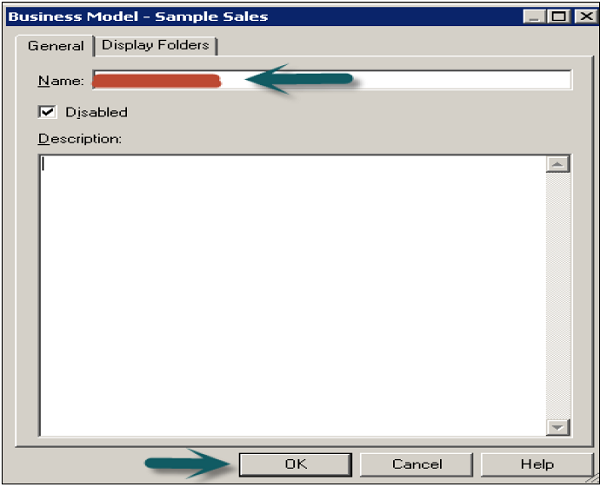
To create a business layer in the repository, right-click → New Business Model → Enter the name of Business Model and click OK. You can also add description of this Business Model if you want.

Logical Tables and Objects in BMM Layer
Logical tables in OBIEE repository exist in the Business Model and Mapping BMM layer. The business model diagram should contain at least two logical tables and you need to define relationships between them.
Each logical table should have one or more logical columns and one or more logical table sources associated with it. You can also change the logical table name, reorder the objects in logical table and define logical joins using primary and foreign keys.
Create Logical Tables Under BMM Layer
There are two ways of creating logical tables/objects in BMM layer −
First method is dragging physical tables to Business Model which is the fastest way of defining logical tables. When you drag the tables from the physical layer to BMM layer, it also preserves the joins and keys automatically. If you want you can change the joins and keys in logical tables, it doesn’t affect objects in the physical layer.
Select physical tables/alias tables under the physical layer that you want to add to Business Model Layer and drag those table under BMM layer.
These tables are known as logical tables and columns are called Logical objects in Business Model and Mapping Layer.

Second method is to create a logical table manually. In the Business Model and Mapping layer, right-click the business model → Select New Object → Logical Table → Logical Table dialog box appears.
Go to General tab → Enter name for the logical table → Type a description of the table → Click OK.

Create Logical Columns
Logical columns in BMM layer are automatically created when you drag tables from the physical layer to the business model layer.
If the logical column is a primary key, this column is displayed with the key icon. If the column has an aggregation function, it is displayed with a sigma icon. You can also reorder logical columns in the Business Model and Mapping layer.
Create a Logical Column
In BMM layer, right-click on logical table → select New Object → Logical Column → Logical Column dialog box will appear, click General tab.
Type a name for the logical column. The name of the business model and the logical table appear in the “Belongs to Table” field just below column name → click OK.
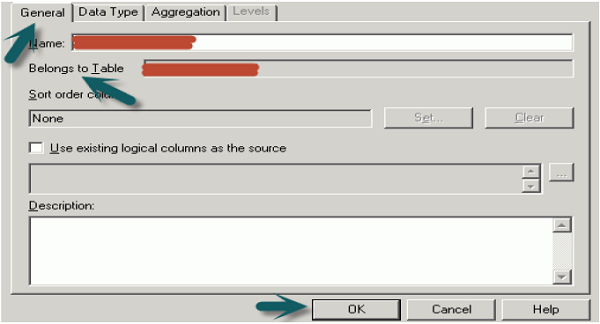
You can also apply Aggregations on the logical columns. Click Aggregation tab → Select Aggregation rule from the dropdown list → Click OK.
Once you apply Aggregate function on a column, logical column icon is changed to show Aggregation rule is applied.

You can also move or copy logical column in tables −
In the BMM layer, you can select multiple columns to move. In the Sources for moved columns dialog box, in the Action area, select an action. If you select Ignore, no logical source will be added in the Sources folder of the table.
If you click on Create new, a copy of the logical source with the logical column will be created in the Sources folder. If you select Use existing option, from the drop-down list, you must select a logical source from the Sources folder of the table.
Create Logical Complex Joins / Logical Foreign Keys
Logical tables in BMM layer are joined to each other using logical joins. Cardinality is one of the key defining parameter in logical joins. Cardinality relation one-to-many means that each row in first logical dimension table there are 0, 1, many rows in second logical table.
Conditions to Create Logical Joins Automatically
When you drag all the tables of the physical layer to business model layer, logical joins are automatically created in Repository. This condition rarely happens only in case of simple business models.
When logical joins are same as physical joins, they are automatically created. Logical joins in BMM layer are created in two ways −
- Business Model Diagram (already covered while designing repository)
- Joins Manager
Logical joins in BMM layer cannot be specified using expressions or columns on which to create the join like in the physical layer where expressions and column names are shown on which physical joins are defined.
Create Logical Joins/Logical Foreign keys Using Join Manager Tool
First let us see how to create logical foreign keys using Join Manager.
In the Administration Tool toolbar, go to Manage → Joins. The Joins Manager dialog box appears → Go to Action tab → New → Logical Foreign Key.
Now in the Browse dialog box, double-click a table → The Logical Foreign Key dialog box appears → Enter the name for the foreign key → From Table drop-down list of the dialog box, select the table that the foreign key references → Select the columns in the left table that the foreign key references → Select the columns in the right table that make up the foreign key columns → Select the join type from the Type drop-down list. To open the Expression Builder, click the button to the right of the Expression pane → The expression displays in the Expression pane → click OK to save the work.
Create a Logical Complex Join using Join Manager
Logical complex joins are recommended in Business Model and mapping layer as compared to the use of logical foreign keys.
In the Administration Tool toolbar, go to Manage → Join → Joins Manager dialog box appears → Go to Action → Click New → Logical Complex Join.
It will open a logical Join dialog box → Type a name for the complex join → In the table drop-down lists on the left and right side of the dialog box, select the tables that the complex join references → Select the join type from the Type drop-down list → Click OK.
Note − You can also define a table as driving table from the drop-down list. This is used for performance optimization when the table size is too large. If the table size is small, less than 1000 rows, it shouldn’t be defined as driving table as it can result in performance degradation.
Dimensions and Hierarchical Levels
Logical dimensions exist in BMM and Presentation layer of OBIEE repository. Creating logical dimensions with hierarchies allows you to define aggregation rules that vary with dimensions. It also provides a drill-down option on the charts and tables in analyses and dashboards, and define the content of aggregate sources.
Create logical dimension with Hierarchical level
Open the Repository in Offline mode → Go to File → Open → Offline → Select Repository .rpd file and click on open → Enter Repository password → click OK.
Next step is to create logical dimension and logical levels.
Right click on Business model name in BMM layer → New Object → Logical Dimension → Dimension with level-based hierarchy. It will open the dialogue box → Enter the name → click OK.
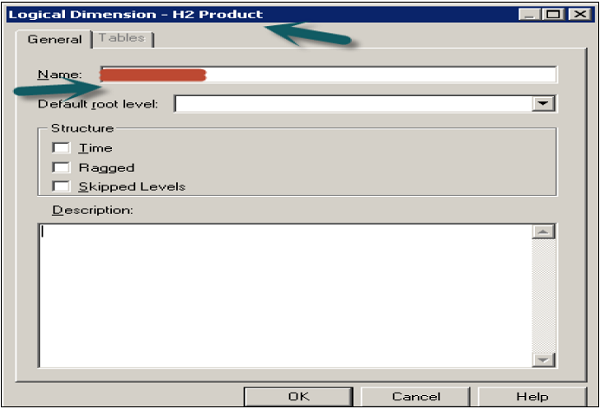
To create a logical level, right-click on logical dimension → New Object → Logical Level.

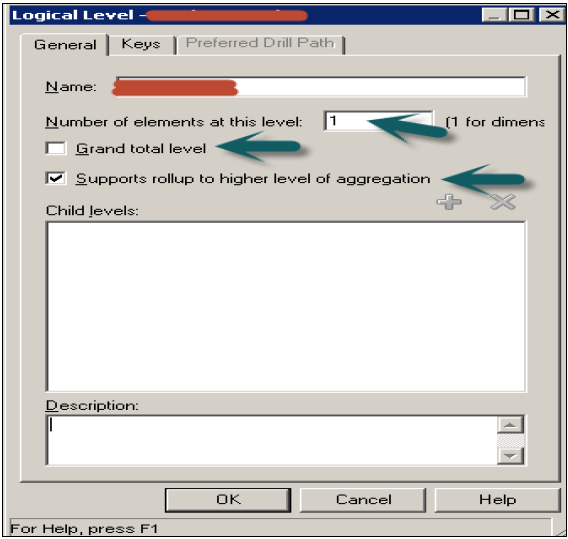
Enter the name of logical level example: Product_Name
If this level is Grand total level, select the checkbox and the system will set number of element at this level to 1 by default → Click OK.
If you want the logical level to roll up to its parent, select the Supports rollup to parent elements checkbox → click OK.
If the logical level is not the grand total level and does not roll up, do not select any of the checkbox → Click OK.
Parent-Child Hierarchies
You can also add parent-child hierarchies in logical level by following these steps −
To define child logical levels, click Add in the Browse dialog box, select the child logical levels and click OK.
You can also right-click on logical level → New Object → Child level.

Enter the name of child level → Ok. You can repeat this to add multiple child levels for all logical columns as per requirement. You can also add Time and Region hierarchies in a similar way.
Now to add logical columns of a table to logical level → select logical column in BMM layer and drag it to logical level child name to which you want to map. Similarly you can drag all the columns of logical table to create parent-child hierarchies.
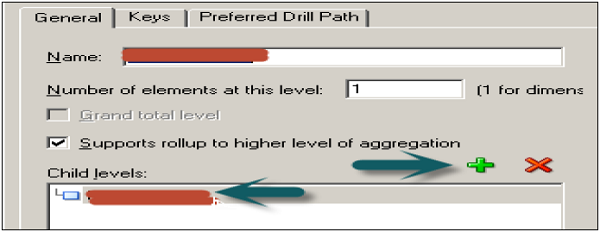
When you create a child level, it can be checked by a double-click on the logical level and it is displayed under child levels list of that level. You can add or delete child levels by using ‘+’ or ‘X’ option on top of this box.
Add Calculation to a Fact Table
Double-click on the column name in logical Fact table → Go to Aggregation tab and select the Aggregate function from the drop-down list → Click OK.

Measures represents data that is additive, such as total revenue or total quantity. Click on save option at the top to save the repository.
There are various Aggregate functions that can be used like Sum, Average, Count, Max, Min, etc.
No comments:
Post a Comment